In order
to start with this topic one should have a clear understanding of Tangible and
Intangible items.
Tangible Items: Items which are physical and exists
in real world are known as tangible items. Install base instances can be used
to track such items. This includes all the items which you can see from your
eyes and can feel by touching. Like your computer laptop, mouse and so on.
Intangible Items: Items which cannot be seen but exists
in virtual world or in business processes such as licenses, software, services
and agreements. Install base instance can be leveraged to track such assets
too.
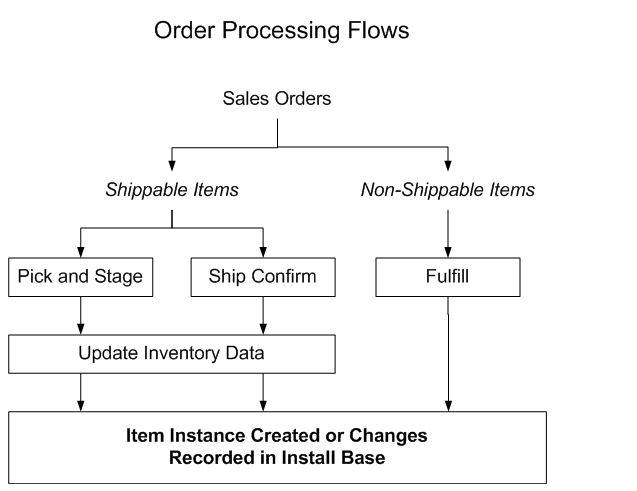
The below fig
depicts a high level flow of the Order processing for both Tangible (Shippable)
item and Intangible (Non-Shippable) Item:
Oracle
Install Base tracking of intangible items at fulfillment requires workflow
customization as defined below:
Tracking intangible
items, which are non-shippable and non-stockable, requires a separate procedure
because Oracle Installed Base has no direct interaction with Oracle Inventory.
With the sales order fulfillment these intangible items are created and
tracked. For this an integration of Oracle Installed base with Oracle Order
Management is required this integration is achieved by modifying the order line
workflows. The following two steps are required to modify order line workflows
to enable Oracle Installed Base tracking for intangible items:
Setup Oracle Workflow Builder
The
workflow builder setup is done in oracle workflow Builder.
1.> Using Oracle Workflow builder on your
client PC connect to the database of your dev instance.
2.> Select OM Order Line from Show Item
Types window.
3.> Click << button to move to
visible list, and click OK.
4.> In navigator window expand the list by
clicking on + sign.
5.> Click OEOL/OM order line to select it,
and now you can add a new function.
6.> Choose Edit>New>Function from
the menu.
7.> In the activity tab page provide Internal Name: INSTALL_BASE_INETRFACE,
Display Name: Install Base Interface, Description: IB interface for fulfillable
order lines, Function Name: CSI_ORDER_FULFILL_PUB.FULFILL_WF, Function Type:
PL/SQL, Result Type: Blank
8.> In the details tab page Error Item Type: WFERROR, Error Process:
RETRY_ONLY, On Revisit: RESET.
9.> Once clicked on OK, you can create a
new process and assign this new function to the new process.
10.>
Select
processes, right click the order line flow that you want to customize and choose
copy, once you apply paste the process property window opens.
11.>
Enter
a different internal name and display name for the newly created process and
click ok. The process is now created.
12.>
Open
the process as created above and click on new function. Click the Internal Name
LOV and choose Install Base Interface.
13.>
Delete
the line after the fulfill function. This line is the one going from fulfill to
the node after Fulfill. Insert Install base Interface after the fulfill function;
drag the Fulfill to the Install base Interface. Now drag the Install base
interface to the node after Fulfill. Choose Any for option results and Save.
Setup oracle Order Management Transaction Type
Below steps can be used to set up the required transaction
types in Oracle Order Management.
1.>
Navigate to Order Management Super User (R)->
Setup(F)-> Transcation types
2.>
Query the desired transaction types and assign
workflows.
3.>
End Date appropriate seeded line types using
seeded workflows.
4.>
Create another record with the same line type as
above.
5.>
Assign modified workflow process as above to this
line type and save.
Process The Sales Order for
an intangible non-shippable item as below:
Once
the above two steps are complete the sales order lines which would be using the
newly customized workflows will have an interface to Oracle Installed Base.
Below steps can be leveraged to process the sales order for Intangible items.
Place
an order for an intangible non-shippable item through Oracle Order Management
using the customized line type.
·
Book
the Sales Order.
·
Run
the Workflow Background process.
·
View
the instance created in Install Base.